The Senior Fitness Test is designed to assess the functional fitness of older adults. By conducting this test, fitness trainers can identify overall weaknesses and movement limitations in seniors. Addressing these issues can help older adults improve their quality of life and maintain independence as they age.
Table of Contents
Safety tips and best practices for the test
To ensure the well-being of older adults, safety is utterly important when conducting the Senior Fitness Test.
- To identify any contraindications or necessary modifications, assess the individual’s medical history and current health conditions in advance.
- Ask the individual to wear comfortable clothing and stable footwear.
- Always start with a good general warm-up, followed by a specific warm-up tailored to the test. This process helps prepare the body and reduces the risk of injury.
- Conduct the test in an environment that is well-lit, free from clutter, and equipped with stable surfaces and tools, like sturdy chairs.
- Pay attention to any sign of dizziness, fatigue, or pain during the test. If needed, pause or modify the test.
A qualified professional should administer the test and provide clear instructions and demonstrations for each activity.
Components of the Senior Fitness Test
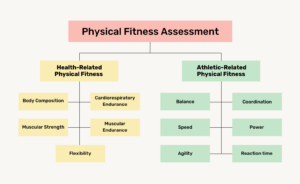
The Senior Fitness Test is made up of simple movements designed to measure key areas of fitness that are important for daily life. These include strength, flexibility, balance, endurance, and overall mobility. By checking each of these areas, we can get a clear picture of someone’s current fitness level and spot any areas that might need extra attention.
| Test | Measure | Equipment |
|---|---|---|
| Chair Stand | lower body strength | chair without arms, stopwatch |
| Arm Curl | upper body strength | 5 lb (women) and 8 lb (men) weights, chair without arms, stopwatch |
| Two-Minute Step Test | physical stamina/endurance | stopwatch, measuring tape, visible tape |
| Chair Sit and Reach | lower body (hamstring) flexibility | chair, ruler |
| Up and Go | speed, agility, balance | chair, cone (or tape), stopwatch |
| Back Scratch Test (aka Zipper Test) | upper body flexibility | ruler |
Chair Stand Test (measuring lower body strength):
- Place a sturdy chair against a wall to keep it from moving.
- Ask the client to sit in the middle of the seat with their feet flat on the floor. Their arms should be crossed at the wrists and held against their chest.
- When they’re ready, start a timer for 30 seconds and count how many times they can fully stand up and sit back down.
Only count a full stand if:
- They don’t use their hands, arms, or any other support to push themselves up.
- Their arms stay against their chest the entire time, without swinging up as they rise.
Arm Curl Test (measuring upper body strength):
- Have the client sit in a chair.
- Give them a dumbbell—5 lbs for women and 8 lbs for men. If they’re unable to lift the standard weight, you can use a lighter one, but note that their results won’t be comparable to the standard norms. Make sure to record this on the scorecard.
- Set a timer for 30 seconds and count how many full arm curls they can complete.
A full arm curl counts only if:
- They fully bend their elbow, bringing the weight up until the lower arm touches the upper arm, then straighten their arm all the way back down.
- Their upper arm stays against their body without swinging the weight for momentum.
2-Minute Step Test (measuring physical stamina/endurance):
- First, find the midpoint between your client’s kneecap and iliac crest.
- Measure the height from the floor to that midpoint and mark it on the wall using chalk or tape. This will serve as a guide to ensure they lift their knees high enough.
- Set a timer for two minutes and count how many full steps they complete.
A step counts only if:
Lift the right knee to the designated height (count each step at this point).
- Both knees consistently reach the correct height throughout the test.
- The right and left feet lift completely off the ground and return before the next step.
The individual may rest as needed during this assessment.
Chair Sit and Reach Test (assessing lower body flexibility, hamstring):
- Place a sturdy chair against a wall so it doesn’t move.
- The individual will sit down and move forward in the chair until they can fully straighten one leg while keeping the other foot flat on the floor.
- They should stack one hand on top of the other and try two practice reaches on each side. You’ll measure using the side where they are most flexible.
- The stretch must be held for 2 seconds—no bouncing or jerking. They cannot grab their leg for support.
To measure the stretch, place a ruler across the individual’s toe at the 6” mark with the zero end being closest to their body. The 6” mark will serve as your zero measurement. When the client reaches forward, you will mark the furthest point they have reached on the ruler.
Scoring Examples:
- If they reach 3 inches (ca. 8 cm), their score is -3.0 (since they didn’t reach the toe).
- If they reach 10 inches (ca. 25 cm), their score is +4.0 (since they went past the toe).
Up and Go Test (measuring speed, agility, and balance):
- Place a sturdy chair against a wall to keep it from moving.
- The individual sits with both feet flat on the floor with hands resting on their lap.
- Set up a marker (such as a cone or brightly coloured tape) 8 feet (2.44 m) in front of the chair, with an obvious straight path to it.
- When ready, start the stopwatch as soon as they begin to raise.
- They must quickly and safely walk to the marker, circle it, and return to their chair.
- Stop the timer when they are fully seated again.
- You will score to the nearest 0.1 (one tenth) of a second.
Back Scratch Test (also known as the Zipper Test—measuring upper body flexibility):
- The individual will perform two practice stretches on each side before the test begins.
- When scoring, use the side that is most flexible and record the best of two attempts.
- They raise their left arm straight up, then bend the elbow to reach their fingers toward the middle of their shoulder blades. At the same time, they extend their right arm down, palm facing outward, then bend the elbow to reach up toward the left hand.
- Touching or overlapping the fingertips is the goal.
Scoring:
- If the fingertips just touch, the score is 0.
- If the fingertips overlap, record a positive score (+).
- If the fingertips do not touch, record a negative score (-).
- Measure to the nearest 0.5 inch.
Table: Senior Fitness Test Average Norms and Standards for Women
| Age Range | 60-64 | 65-69 | 70-74 | 75-79 | 80-84 | 85-89 | 90-94 |
|---|---|---|---|---|---|---|---|
| Chair Stand (reps) | 12-17 | 11-16 | 10-15 | 10-15 | 9-14 | 8-13 | 4-11 |
| Arm Curls (reps) | 13-19 | 12-18 | 12-17 | 11-17 | 10-16 | 10-15 | 8-13 |
| 2-Minute Step (steps) | 75-107 | 73-107 | 68-101 | 68-100 | 60-91 | 55-85 | 44-72 |
| Sit and Reach (inches) | <0.5 | <0.5 | <1.0 | <1.5 | <2.0 | <2.5 | <4.5 |
| Back Scratch (inches) | <3.0 | <3.5 | <4.0 | <5.0 | <5.5 | 1.0-7.0 | 1.0-8.0 |
| Up and Go (seconds) | 4.4-6.0 | 4.8-6.4 | 4.9-7.1 | 5.2-7.4 | 5.7-8.7 | 6.2-9.6 | 7.3-11.5 |
Table: Senior Fitness Test Average Norms and Standards for Men
| Age Range | 60-64 | 65-69 | 70-74 | 75-79 | 80-84 | 85-89 | 90-94 |
|---|---|---|---|---|---|---|---|
| Chair Stand (reps) | 14-19 | 12-18 | 12-17 | 11-17 | 10-15 | 8-14 | 7-12 |
| Arm Curls (reps) | 16-22 | 15-21 | 14-21 | 13-19 | 13-19 | 11-17 | 10-14 |
| 2-Minute Step (steps) | 87-115 | 86-116 | 80-110 | 73-109 | 71-103 | 59-91 | 52-86 |
| Sit and Reach (inches) | <2.5 | <3.0 | <3.5 | <4.0 | <5.5 | <5.5 | <6.5 |
| Back Scratch (inches) | <6.5 | 1.0-7.5 | 1.0-8.0 | 2.0-9.0 | 2.0-9.5 | 3.0-10 | 4.0-10.5 |
| Up and Go (seconds) | 3.8-5.6 | 4.3-5.7 | 4.2-6.0 | 4.6-7.2 | 5.2-7.6 | 5.3-8.9 | 6.2-10.0 |
Senior Fitness Test Scores
The Senior Fitness Test can provide valuable insights into a participant’s current physical fitness level and movement quality. However, the accuracy of these insights depends on the practitioner’s experience and the participant’s condition. This test assesses multiple fitness components, including strength, flexibility, endurance, and balance.
Typically, the Senior Fitness Test scores are compared to normative data based on age and gender, providing a benchmark for evaluation. The following normative data comes from Measuring Functional Fitness of Older Adults, The Journal on Active Aging (2002): 24-30, authored by Roberta Rikli, PhD, and Jessie Jones, PhD.
In our fitness coaching programmes, we don’t rely on normative data. Instead, we focus on identifying weaknesses in movement and fitness levels unique to each individual.
Understanding these limitations is far more important than comparing someone’s fitness to a general standard. Through ongoing assessments and regular testing, we track progress and measure the effectiveness of our programmes.
It doesn’t really matter how fit or unfit someone is according to a score. What’s important is understanding their limitations and figuring out what needs to be done to improve their physical condition. Instead of comparing them to some “fit” person in the same age or gender category, the focus should be on what actually helps them move better and feel stronger.
Fitness improvement should be centred around meeting an older adult’s daily physical demands and allowing them to stay independent, fit, and healthy. This approach should be personalised and realistic, depending on their current condition. When assessed regularly, it leads to a better quality of life and overall well-being. This kind of fitness coaching doesn’t rely on normative data—it’s about what truly benefits the individual.
Fitness programming
To help older adults improve their fitness and move better, a coach needs to do more than just spot weaknesses or needs. It’s just as important to understand how to safely and effectively improve someone’s fitness over time, making steady progress through the right approach.
A well-designed coaching program typically has two key parts:
- Assessment—evaluating the client’s current fitness level and spotting any limitations or areas that need work.
- Programming—creating a personalised plan based on their specific goals and needs.
It’s important to remember that both assessment and programming are ongoing processes. These processes are not static. Adjustments may be needed from session to session, week to week, or month to month to keep the client progressing safely and effectively.
This is where coaching becomes an art. Knowing when and how to adapt the plan is what makes the difference between a good program and a great one.
Conclusion
As we get older, it’s common to notice a decline in key areas of fitness like strength, muscle mass, bone density, flexibility, balance, agility, and cardiovascular endurance.
When these areas weaken, it can lead to poor movement, reduced mobility, and slower reactions. Over time, such weakness increases the risk of chronic pain, falls, and difficulty handling everyday activities.
By regularly assessing fitness levels—using tools like the Senior Fitness Test—coaches and fitness professionals can spot early declines and create targeted fitness programmes to help improve these areas before they become bigger issues.
Fitness assessments play a vital role in helping older adults stay independent, reduce the risk of chronic disease, move comfortably without pain, and maintain a high quality of life.
It’s also important to remember that assessment and programming are ongoing processes. They need to evolve and adapt over time. Regular tests and updates to the fitness programme are key to overcoming limitations and continuing to make progress.
